
This page assumes that you have a Data-NFT, and you have your Helo Device. And these are the final steps to get everything setup and running:
- Get the Helo App – this is where you can view and measure your health metrics.
- Bind Your Device to the Helo App – Your device pairs to the Helo app via Bluetooth to collect your health data
- Bind Your Device to the Data-NFT – This also bind your device to the data NFT in the InPersona app via the MAC address, and your Helo UID
- Set up Your Helo Wellness+ Subscription – With the subscription you get all the health measurements and Oracle AI reports each month. And…it is only $9.90 per month.
If you do not yet have a Data-NFT or the InPersona app, then please refer to the InPersona page. You can return here once you have your device, and then complete the setup.
Let’s get started!
Helo Smart App
You can download and install the Helo Smart app at any time. However you will not be able to bind your device to the app until it arrives. You can get the app via the links below:
Bind Device to Helo App
Once your device arrives, the first thing is to fully charge it. Because most Bluetooth devices are easier to bind with a full charge. Before starting, make sure Bluetooth is set to ON in your phone.
- Open the Helo Smart app, and then select Device at the bottom of the screen.
- You will see 3 device choices. Select either Watch or Band depending of your choice of device.
- The name of your device should appear at the top of the screen. Then hit connect at the right of the name.
- The device should then be connected, just like any other Bluetooth device.
Next we need to Bind the device to your Data NFT. In order to bind your device to your data NFT, you will need to have both the InPersona and the Helo Smart apps open. This is because you will need the MAC address and your Helo UID from the Helo app to connect to the Data-NFT.
Bind Helo Device to InPersona Data NFT
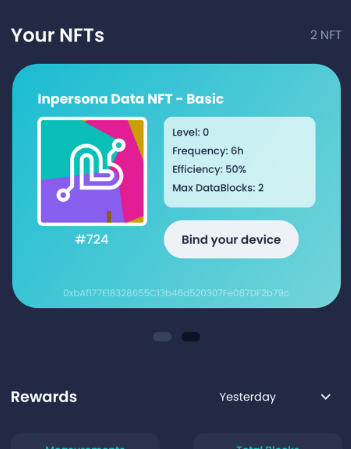
- In the InPersona app you should see your Data NFT. See the picture on the right.
- If the NFT does not appear, then verify that it is on the right blockchain. Then check in the upper right corner, click on the heart. There will be 3 choices: Vyvo Smart Chain, Polygon, or Binance Smart Chain.
- Try each chains to see if your NFT appears. If not, then try logging out of the app and back in.
- Next select “Bind Your Device”. You need to enter the 8 digit PIN that you created with your wallet.
- Now we need to get the MAC address from the Helo app. So select Device at the bottom of the screen.
- At the top of the Device screen, you will see device name, etc. Find the MAC address (“MAC:”). Select the small box on the right of the MAC address to copy it.
- In the InPersona app, you need to enter the device information. The first box contains Helo/Vyvo. So, leave that alone. In the Device MAC box, paste the MAC address that you copied from the Helo app.
- Now, go back to the Helo app. Then choose Profile at the bottom right of the screen.
- At the Profile screen, select Edit Profile under your email address.
- The second box contains your Helo UID. Use the small box to the right to copy it.
- Back in the InPersona app, paste the UID from the Helo app in the Helo/Vyvo UID box. You may have to scroll down a little to see the box.
- Scroll down to the bottom of the screen, and select “Bind“.
Congratulations! You are now ready to mine crypto with your heartbeat and health data, once the the Founder’s phase ends and mining starts.
Helo Wellness+ Subscription
The final step is to set up your Helo Wellness+ subscription. Wait until you actually get your device, otherwise you will not get to use the full month subscription!

- Just as you did to get your device, go to HeloHealth.com, then click the SHOP button on the top right of the screen.
- Sign in just as you did before
- On the next screen, scroll down until you see Helo Wellness+, then click “Discover More”.
- You will see the subscription for $9.90. Click BUY NOW.
- You are now at the checkout screen. Here you can use your Affiliate code found in your inPersona app (click your name and it is on that screen) for an ongoing 10% discount. Note that this is NOT a promo code. Look for the box to enter your Affiliate code, and it may be on the next screen.
- After you enter the affiliate code, your discount will appear. Then you just have to finish the checkout! Your subscription is active immediately.
Congratulations!
You should now be up and running. If you are having any problems, please refer back to the InPersona page. At the bottom is information on how to submit a ticket to support if needed.
Again, congratulations! You have made an excellent decision to help monitor and improve your health.